|
|
| (47 intermediate revisions by 16 users not shown) |
| Line 3: |
Line 3: |
| |type =section | | |type =section |
| |image =Fo3MZ weapons lab panorama.jpg | | |image =Fo3MZ weapons lab panorama.jpg |
| | |label =Interior |
| |part of =[[Zeta|Mothership ''Zeta'']] | | |part of =[[Zeta|Mothership ''Zeta'']] |
| |local map =Weapons Lab map.png | | |local map =Weapons Lab map.png |
| |local map desc =<div style="text-align: left">"A" =shooting range location<br />"B" =[[Destabilizer (Fallout 3)|Destabilizer]]<br />"C" =[[Experimental weapons drone]]s with [[drone cannon Ex-B]]<br />"D" =[[Atomic pulverizer]]<br />Two unmarked doors in the middle are teleports (see article).</div> | | |local map desc =<div style="text-align: left">"A" =shooting range location<br />"B" =[[Destabilizer (Mothership Zeta)|Destabilizer]]<br />"C" =[[Drone#Experimental Weapons Drone|Experimental Weapons Drone]]s with [[Drone Cannon Ex-B]]<br />"D" =[[Atomic Pulverizer]]<br />Two unmarked doors in the middle are teleports (see article).</div> |
| |connects to =[[Experimentation lab]]<br />[[Observation deck]] | | |connects to =[[Experimentation Lab]]<br />[[Observation Deck]] |
| |quests =[[This Galaxy Ain't Big Enough...]] | | |quests =[[This Galaxy Ain't Big Enough...]] |
| |world map exits = | | |world map exits = |
| |factions =[[Raiders (Fallout 3)|Raiders]] | | |factions =[[Raider (Fallout 3)|Raiders]] |
| |robots =[[Automated turret (Fallout 3)|Automated turret]]s<br />[[Guardian drone]]s<br />[[Experimental weapons drone]]s | | |robots =[[Turret (Fallout 3)|Automated Turret]]s<br />[[Drone#Guardian Drone|Guardian Drone]]s<br />[[Drone#Experimental Weapons Drone|Experimental Weapons Drone]]s |
| |creatures =[[Alien (Fallout 3)|Aliens]] | | |creatures =[[Alien (Mothership Zeta)|Aliens]] |
| |cell name =DLC05ExLab02 | | |cell name =DLC05ExLab02 |
| |refid ={{DLC ID|004a14}} | | |refid ={{DLC ID|004a14}} |
| }}{{Games|FO3MZ}}
| | }} |
|
| |
|
| The '''weapons lab''' is a location on board [[Zeta|Mothership ''Zeta'']]. The player must travel via this location as a part of [[This Galaxy Ain't Big Enough...]] quest. | | The '''Weapons Lab''' is a location on board [[Zeta|Mothership ''Zeta'']]. The player must travel via this location as a part of [[This Galaxy Ain't Big Enough...]] quest. |
|
| |
|
| ==Background== | | ==Background== |
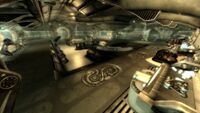
| The weapons lab is where much of the aliens' more offensive technology is tested. This facility is located on the upper level of Mothership ''Zeta'' through a door leading from the [[observation deck]]. As the name indicates, the Lab is the place where alien weapons are being created, thus you can find many standard weapons as well as several unique versions of these weapons. | | The Weapons Lab is where much of the Aliens' more offensive technology is tested. This facility is located on the upper level of Mothership ''Zeta'' through a door leading from the [[Observation Deck]]. As the name indicates, the Lab is the place where alien weapons are being created, thus, many standard weapons as well as several unique versions of these weapons can be found here. |
|
| |
|
| ==Layout== | | ==Layout== |
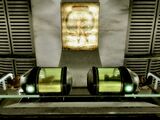
| After passing through the door near the teleporter that has inconveniently been deactivated, you will enter a large room. Immediately, you should notice two [[Automated turret (Fallout_3)#Alien turret .28Mothership Zeta.29|alien turret]]s firing at you from the ceiling. Additionally, a couple of aliens and a [[guardian drone]] inhabit this room. If you head southwest, you can find a small room on the right (open it via the control panel just next to it) that holds the [[atomic pulverizer]], which is a slightly upgraded version of the [[alien atomizer]].
| | Passing through the door near the Teleporter that has inconveniently been deactivated, leads to a large room. Almost immediately there will be a confrontation with two ceiling mounted [[Automated Turret (Fallout_3)#Alien Turret (Mothership Zeta)|Alien Turret]]s. Additionally, a couple of Aliens and a [[Drone#Guardian Drone|Guardian Drone]] inhabit this room. Heading southwest, there is a small room on the right (open it via the control panel just next to it with a science check of 75) that holds the [[Atomic Pulverizer]], which is a unique and slightly upgraded version of the [[Alien Atomizer (Mothership Zeta)|Alien Atomizer]]. |
|
| |
|
| Continue through this passageway, and you will come to a three-way intersection. Left is a blocked passageway, right goes to a flight of stairs. Go up the stairs and then take the first left. You will find yourself on the platform from which the aliens you first encountered in this room were targeting you. On this level there is a [[healing archway]] to the left and a control panel for opening up the next area. After activating the control panel, go south down a set of stairs from the platform and then proceed to a another alien/drone-infested room via the east door. Continue on until you enter a room full of weapons and armor for the taking.
| | Continuing through this passageway will lead to a three-way intersection. Left is a blocked passageway, right goes to a flight of stairs. Go up the stairs and then take the first left to wind up on the platform from which the Aliens first encountered in this room were. On this level, there is a [[Healing Archway]] to the left and a control panel for opening up the next area. After activating the control panel, go south down a set of stairs from the platform and then proceed to a another Alien/Drone-infested room via the east door. Continue on to find a room full of weapons and armor for the taking. |
|
| |
|
| This is also the only place where [[experimental weapons drone]]s can be found. Outside of the experimental drone room, the control panel for [[Alien captive recorded log#Alien captive recorded log 24|alien captive log 24]] can be found. After your shopping spree, you can go through a door to the north and explore a range/training area, which allows you to receive [[Xenotech Expert]] perk. But to move onward with the mission, go to the southeast door into the [[experimentation lab]]. | | This is also the only place where [[Drone#Experimental Weapons Drone|Experimental Weapons Drone]]s can be found. Outside of the Experimental Drone room, the control panel for [[Alien captive recorded log#Alien captive recorded log 24|alien captive log 24]] can be found. After the "shopping spree", go through a door to the north and explore a range/training area, which allows the player character to receive [[Xenotech Expert]] perk. To move onward with the mission, go to the southeast door into the [[Experimentation Lab]]. |
|
| |
|
| ==Obtaining Xenotech Expert perk== | | ==Obtaining Xenotech Expert perk== |
| Line 32: |
Line 33: |
| {{Transcludesection|Xenotech Expert|obtaining|options=nointro}} | | {{Transcludesection|Xenotech Expert|obtaining|options=nointro}} |
|
| |
|
| ==Notable loot== | | ==Loot== |
| {{Notable content | | {{Notable content |
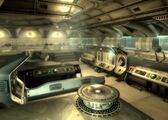
| | 87 [[Alien power cell (Fallout 3)|alien power cell]]s on a counter, usable with the [[Alien blaster (Fallout 3)|alien blaster]], in the room with other human and alien technology consisting of several ordinary alien weapons and a [[Gatling laser (Fallout 3)|Gatling laser]] (south in local map). | | | 87 [[Alien Power Cell (Fallout 3)|Alien Power Cell]]s on a counter, usable with the [[Alien Blaster (Fallout 3)|Alien Blaster]], in the room with other human and alien technology consisting of several ordinary alien weapons and a [[Gatling Laser (Fallout 3)|Gatling Laser]] (south in local map). |
| | [[Destabilizer (Fallout 3)|Destabilizer]] (unique version of [[alien disintegrator]]) on a shelf in the training area, next to exit ('''B''' on the map). | | | [[Destabilizer (Mothership Zeta)|Destabilizer]] (unique version of [[Alien Disintegrator (Mothership Zeta)|Alien Disintegrator]]) on a shelf in the training area, next to exit ('''B''' on the map). |
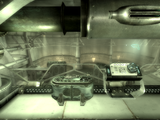
| | [[Atomic pulverizer]] (unique version of [[alien atomizer]]), as well as a [[Buttercup toy]], in the room behind unlockable door in one of the corridors ('''D''' on the map), plus even more alien power cells on the same shelf. | | | [[Atomic Pulverizer]] (unique version of [[Alien Atomizer (Mothership Zeta)|Alien Atomizer]]), as well as a [[Buttercup toy]], in the room containing a drone pod behind an unlockable door in one of the corridors ('''D''' on the map), plus even more alien power cells on the same shelf. |
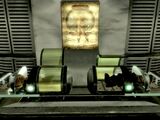
| | Two [[drone cannon Ex-B]]s (unique [[drone cannon]]), obtainable by killing the [[experimental weapons drone]]s ('''C''' on the map). | | | Two [[Drone Cannon Ex-B]]s (unique [[Drone Cannon]]), obtainable by killing the [[Drone#Experimental Weapons Drone|Experimental Weapons Drone]]s ('''C''' on the map). |
| | [[Alien captive recorded log#Alien captive recorded log 24|Alien captive recorded log 24]] in the same room as the alien power cells. | | | [[Alien captive recorded log#Alien captive recorded log 24|Alien captive recorded log 24]] in the same room as the alien power cells. |
| | [[Buttercup toy]] on a shelf in a room containing a drone pod; near the stairs to a long hallway.
| |
| }} | | }} |
|
| |
|
| ==Notes== | | ==Notes== |
| * This is one of many areas of the ship that will not be accessible after [[This Galaxy Ain't Big Enough...]] has been completed. | | * This is one of many areas of the ship that will not be accessible after [[This Galaxy Ain't Big Enough...]] has been completed. |
| * Albino radscorpions can make their way out of the shooting range to attack the player, as well as glitch into the ceiling and floor. | | * Albino Radscorpions can make their way out of the shooting range to attack the player, as well as glitch into the ceiling and floor. |
| <gallery type="slideshow" widths="200"> | | <gallery type="slideshow" widths="200"> |
| Teddy and gnome in stasis.jpg|Teddy and gnome in statis | | Teddy and gnome in stasis.jpg|Teddy and gnome in statis |
| Teddy and gnome out of stasis.jpg|Teddy and gnome out of stasis | | Teddy and gnome out of stasis.jpg|Teddy and gnome out of stasis |
| </gallery> | | </gallery> |
| * In the first room you can find a teddy bear and a garden gnome sleeping in tiny stasis chambers; they're on a small balcony near the ceiling. | | * In the first room there is a teddy bear and a garden gnome sleeping in tiny stasis chambers; they're on a small balcony near the ceiling. |
| * It is '''not''' possible to access the part of the "firing range" where the raiders etc. teleport in - they can only be shot at from the balcony above. | | * It is '''not''' possible to access the part of the "firing range" where the Raiders etc. teleport in - they can only be shot at from the balcony above. |
| * However, it is possible to access this "firing range using the "unarmed teleport" glitch. Wait until a Giant Radscorpion is close, then use VATS to attack with an unarmed weapon. If you can get more than a zero attack chance in VATS, you will "teleport" down to the gallery floor. You can access the dead raiders and the (nonfunctional) teleporters in the gallery, but you CANNOT get back without console commands. | | * However, it is possible to access this "firing range using the "unarmed teleport" glitch. Wait until a Giant Radscorpion is close, then use V.A.T.S. to attack with an unarmed weapon. If the player can get more than a zero attack chance in V.A.T.S., they will "teleport" down to the gallery floor. The dead Raiders can be looted, but you '''CANNOT''' get back to the balcony without console commands. |
| * After spawning large numbers of creatures and raiders it is possible for the frame rate to drop. | | * It is possible for the framerate to drop if enough creatures and Raiders are spawned in. |
|
| |
|
| ==Appearances== | | ==Appearances== |
| The weapons lab appears only in the ''[[Fallout 3]]'' [[Fallout 3 add-ons|add-on]] ''[[Mothership Zeta (add-on)|Mothership Zeta]]''. | | The Weapons Lab appears only {{in|FO3MZ}} |
|
| |
|
| ==Gallery== | | ==Gallery== |
| <gallery widths=220> | | <gallery widths=200> |
| | FO3 Map Zeta Weapons Lab High Res.webp|Map of the Weapons Lab and Observation Deck |
| Weapons Lab.jpg | | Weapons Lab.jpg |
| WeaponsLab.png|The shooting range | | WeaponsLab.png|The shooting range |
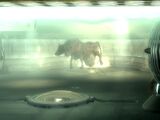
| Brahmin spawned MZ.jpg|Et voila, spawned a brahmin! | | Brahmin spawned MZ.jpg|Et voila, spawned a Brahmin! |
| Power_cells_and_log24.jpg|Loot in abundance; to the left [[alien captive recorded log]] 24, to the right [[alien atomizer]]s, 87 [[Alien power cell (Fallout 3)|alien power cells]], [[Plasma mine (Fallout 3)|plasma mines]], [[Pulse grenade (Fallout)|pulse grenades]] and a [[Gatling laser (Fallout 3)|Gatling laser]] | | Power_cells_and_log24.jpg|Loot in abundance; to the left [[alien captive recorded log]] 24, to the right [[Alien Atomizer (Mothership Zeta)|Alien Atomizer]]s, 87 [[Alien Power Cell (Fallout 3)|Alien Power Cells]], [[Plasma Mine (Fallout 3)|Plasma Mines]], [[Pulse Grenade (Fallout 3)|Pulse Grenades]] and a [[Gatling Laser (Fallout 3)|Gatling Laser]] |
| | Fo3MZ Destabilizer.jpg|[[Destabilizer (Mothership Zeta)|Destabilizer]] |
| | Alien_power_cells_weapons_lab.jpg|[[Alien Power Cell (Fallout 3)|Alien Power Cells]] |
| | Fo3MZ Atomic Pulverizer Buttercup toy and power cells.jpg|[[Atomic Pulverizer]] and [[Buttercup toy]] |
| | Alien captive recording log 24 weapons lab.jpg|[[Alien captive recorded log]] 24 |
| </gallery> | | </gallery> |
|
| |
| ==Interactive map==
| |
| <imap map-id=2956 />
| |
|
| |
|
| {{Navbox locations FO3}} | | {{Navbox locations FO3}} |
| Line 72: |
Line 74: |
|
| |
|
| [[Category:Mothership Zeta locations]] | | [[Category:Mothership Zeta locations]] |
|
| |
| [[ru:Оружейная лаборатория]]
| |